On the Edge with Edmund
For many, the arrival of November means the arrival of cooler weather, even snow! For others, it may mean the arrival of another month’s worth of homework. And for some, the arrival of the new month means it’s time to go hunt a turkey. For me however, this month means one thing: food galore! I personally go through more food in about a week than most people go through in a month, and I’m okay with that! This month’s recipes bring in the lovely autumnal weather, and I hope that you enjoy them!
Being the dummy that I am, I came back to school after a great weekend at home and didn’t bring my USB cable for my camera, but fear not, I shall provide a picture of what my cheesecake looked like when it was done. Or at least what it looked like before I ate it. Rapidly.
To preface this recipe, I should alert you to a piece of cookware that you may or may never have used; the spring form pan. A spring form pan essentially allows you to screw the edges closed, bake your goods, and then undo the screw, allowing you to get every last bit of the edges off the pan without any hassle! Does that sounds too good to be true? Try it out, you’ll be flabbergasted!
Cheesecake of Nomness
- 1 tablespoon softened butter
- 10 crunched up chocolate cookies (or more if you want a thicker crust. Also, I recommend you crush them yourself with a rolling pin…because it’s fun!)
- 3 (8 ounce) packages of cream cheese, at room temperature
- 1 cup sugar
- 3 large eggs
- 2 teaspoons vanilla extract
- ¼ cup heavy cream (half and half works just as well, and is much easier to access; if you’ve got that, use it!)
- ¼ cup sour cream (like last month, if you have plain yogurt, that can always be substituted for sour cream)
- And aluminum foil for your magical spring form pan.
To make this delicious and decadent cheesecake, first get your crumbs ready. Whack those cookies with your rolling pan until the crumbs are quite small. After you have your crumbs ready, take your butter and smear it all over the pan – it not only will stop the cake from sticking, but also adds a little moisture to the crust and sides of the cake. Then press all your crumbs into the bottom of the pan, forming a tightly compacted crust.
As tempting as it is to just eat the cookies, be patient, and being beating your cream cheese in a mixer until it is smooth. At this point (typically about 1 minute on medium speed), add in the sugar and beat it in to the cream cheese mix. Add all the other ingredients, and don’t be afraid to let the mixer go for quite a while – a lumpy cheesecake is no one’s friend. At this point, pour your batter into the spring form pan (or any pan with high edges, if you don’t have a spring form), and watch it just ooze all over the cookie crust in deliciousness.
There’s only one more preparatory step before the cake starts cooking: take your pan full of goodness and place it onto a cross-shaped pattern of aluminum foil, as such:
Fold the aluminum foil over the edge of the pan, and crimp it tightly around the edges to stop water from getting in during the baking process.
Water? I didn’t mention anything about water, you’re right! Surprise! This is the most important part of getting a delicious and smooth cheesecake. Find another larger pan with high edges, and fill it with hot or boiling water up to the halfway point on your cake pan. Gently place the cheesecake in the foil-wrapped pan into the water bath, and then put the large pan into the oven at 325 degrees for 40 minutes. The hot water surrounding the cheesecake will help to cook it evenly throughout and will give it a creamy consistency like a restaurant cheesecake.
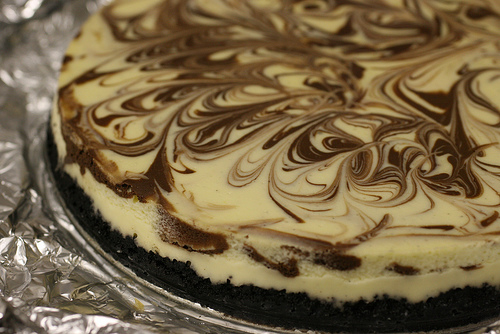
After the cheesecake has cooked for 40 minutes, turn off the heat to the oven, but don’t take out the cake. The residual heat of the oven will help to get it cooked just right. Refrigerate for a minimum of 3 hours, then enjoy! For my cheesecake, I coated the top with Nutella, but there are near limitless choices – strawberries, raspberries, blueberries or blackberries could be added on top if you wanted a fruity choice, or an icing could be added after the cake has cooled. Be adventurous – I’m sure it’ll taste delicious regardless! Here’s a picture of professional-made cheesecake with Oreo crust to inspire you – I promise I made this recipe, it’s delicious!
The second recipe of this month is much much simpler. It’s so simple, in fact, that I don’t actually have a recipe I follow. This recipe is one that I make every autumn, and all it requires is blackberries, oats, butter, and spices!
If you have access to fresh blackberries and can pick them yourself, I strongly recommend it – it’s fun, you can to eat while you ‘work’ and the final product is delicious! If not, any sort of blackberry would work, although I haven’t experimented much with frozen berries. Take the berries, and after a light rinse, put them in the bottom of a 9x9 glass pan. Try to fill the pan about 2/3 full of berries, they’ll compress during cooking!
After the berries are in place, combine oats, about half a stick of butter, and a variety of spices (nutmeg, allspice, cloves, and cinnamon are great places to start). Experiment with spices and you’ll find a taste that you like, and then take this delicious mixture and plop it on top of the berries. Yep, it’s that simple!
Try to pack the oats a bit, but not too much, or they won’t cook right. Put this in the oven at 350 degrees, and start off with 15 minutes. This is another part that has to be sort of fudged. You’ll know the crisp is done when the berries start to burble up through the topping, and believe me, that is a beautiful sight.
After that’s happened, take the crisp out of the oven, place it on a wire rack to cool, and let it cool for about 20 minutes before you even try to eat any of it – I don’t want any burned tongues on my conscience!
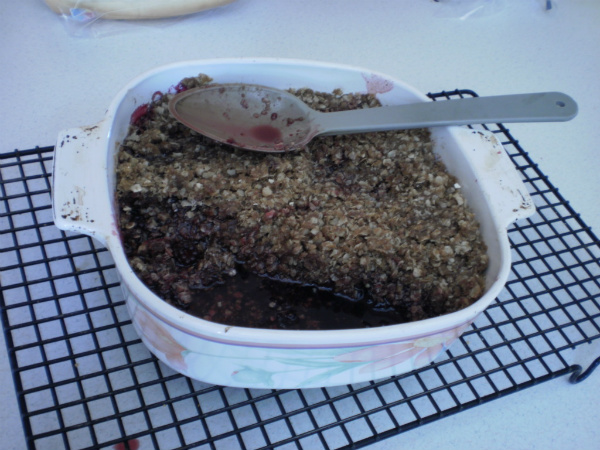
Here’s a picture of my crisp!
And remember, your crisp may not look the same, but it’ll be delicious, I assure you. So whether you plan on enjoying the fall weather, turkey hunting, or homework, I encourage you to enjoy some new recipes and stuff your face full of delicious desserts. I know I will – see you next time On the Edge!


